Setup a GraphQL API with Next.js
In this article I'm going to show how you can setup a GraphQL API with Next.js.

Hey there! 👋🏽 I'm a tech-savvy software engineer from Brazil. When I'm not crafting solutions or exploring new tech realms, I'm likely daydreaming about my next beach escape or scouting hidden food gems. Whether it's debugging intricate lines of code or discovering delicious local flavors, I'm all about diving into life's exciting experiences. 🇧🇷 👨💻 🏝️ 🌮
In this article I'm going to show how you can setup a GraphQL API with Next.js. You can access the source code anytime here.
1. Introduction
GraphQL is a powerful query language that provides a complete description of the data in your API. It is strongly typed and you can ask to the server the exact amount of data you need from the client side avoiding common problems on REST APIs like overfetching and underfetching.
1.1. Techs
1.2 About GraphQL
GraphQL is a query language for APIs and a server-side runtime for executing queries. Those queries are tied to a type system you define to your data.
1.3 About Next.js
Next.js is one of the most popular React frameworks. It comes with cool features like file-system based router, server side rendering, API routes, etc.
1.4 Motivations to use GraphQL with Next.js
The main problems that GraphQL solves is over-fetching and under-fetching data on the client side and with Next.js it is not different.
Usually when the app fetch data from a REST APIs it hits an endpoint and a JSON object or array is received as response. The client doesn't have any control over the response object. This leads to two scenarios.
First, if most of these data is not used by the components, the client is over-fetching data. The opposite scenario happens if some data is missing and the developer must add new requests to have access to the data needed. Both problems can lead to performance issues.
Moreover, Next.js provides an easy way to create API routes which is a very convenient way to setup our GraphQL API.
2. Start up the application
Now that you understand the basics about Next.js and GraphQL let's start the project. It is really easy to start a Next.js application, to do this just go to your terminal and run the following command.
$ npx create-next-app@latest --typescript
Note: using Typescript here, but it is not necessary.
The command will prompt to insert your application name, in my case I choose manga-graphql-api.
Just open the project in your code editor and we are good to go.
3. Setup the GraphQL API.
We will rely on apollo-server-micro library to create our GraphQL API. Thus, the first step is to install this dependency with the following command.
$ npm i apollo-server-micro
3.1 Creating GraphQL route and starting Apollo Server
We are going to start the GraphQL server using Next.js API routes. Based on this we will create our route on pages/api/graphql.ts. This file will export a default function which will be our API handler.
Next.js will automatically create a route path to our server on the api/graphql and it can be called anywhere on client side. The file content will look like this:
// pages/api/graphql.ts

import { ApolloServer, gql } from "apollo-server-micro";
import type { NextApiRequest, NextApiResponse } from "next";

// 1. Define some generic type definitions to avoid errors when starting the server.
const typeDefs = gql`
  type Human {
    name: String
    age: Int
  }

  type Query {
    human: Human
  }
`;

// 2. Create a serve instance
const apolloServer = new ApolloServer({
  typeDefs,
});

// 3. Start the server
const startServer = apolloServer.start();

// 4. this is the handler function that will be called
// when we fetch `app/graphql` url from the client side.
export default async function handler(
  req: NextApiRequest,
  res: NextApiResponse
) {
// 5. Setup some headers to avoid Cors issues when redirecting to graphql apollo studio
  res.setHeader("Access-Control-Allow-Credentials", "true");
  res.setHeader(
    "Access-Control-Allow-Origin",
    "https://studio.apollographql.com"
  );
// 6. Allow only `POST` methods.
  res.setHeader("access-control-allow-methods", "POST");
  res.setHeader(
    "Access-Control-Allow-Headers",
    "Origin, X-Requested-With, Content-Type, Accept"
  );
  if (req.method === "OPTIONS") {
    res.end();
    return false;
  }

// 7. await server to get started
  await startServer;

// 8. create the server handler on the specified path.
  await apolloServer.createHandler({
    path: "/api/graphql",
  })(req, res);
}

// 9. Avoid Next.js parsing the body, because Apollo server already does it by default.
export const config = { api: { bodyParser: false } };
Now you can start your application running npm run dev in your terminal. If you open the browser and navigate to localhost:3000/api/graphql you will see that it will be redirected to Apollo Studio Explorer.
You can create some queries but every value will be returned as null. This happens because the API doesn't have resolvers to handle the queries. That leads us to the next step of our setup.
3.2 Creating Schemas and Resolvers
In order to fetch data from our GraphQL api we must create schemas and resolvers. Schemas are basically type definitions and Resolvers are functions that will handle the queries and return the data needed. We will discuss each one in the next sessions.
To keep everything separated we are going to create a graphql folder on the root of our project in which we can define our schemas and resolvers.
3.2.1 Schemas
GraphQL schemas defines what types of data a client can read and write. Therefore we must specify the exact properties that our data have. We can define schemas with GraphQL schema language. Follow the link if you want to learn more about it.
For this application our API will be returning data about mangas series and the data returned will have the following structure.
 {
      "id": "1",
      "name": "Jujutsu Kaisen",
      "score": "8.88",
      "author": "Gege Akutami",
      "demographic": "Shonen",
      "categories": [ "Adventure", "Dark Fantasy", "Supernatural"]
    }
Based on this we can define a schema that will return the desired data as follows.
// graphql/mangas.schema.ts

import { gql } from "apollo-server-micro";

export const mangaSchema = gql`
  enum Demographic {
    SHONEN
    KODOMO
    SHOJO
    SEINEN
    JOSEI
  }

  enum Category {
    ADVENTURE
    DARK_FANTASY
    ACTION
    SUPERNATURAL
    DRAMA
  }

  type Manga {
    id: ID!
    name: String!
    score: Float
    author: String!
    demographic: Demographic
    categories: [Category]!
  }

  input AddMangaInput {
    name: String!
    score: Float
    author: String!
    demographic: Demographic!
    categories: [Category]
  }

  type Query {
    mangas: [Manga]
    mangaById(id: ID!): Manga
  }

  type Mutation {
    createManga(input: AddMangaInput): Manga
  }
`;
Looking to the file above you may have notice that we have two special types called Query and Mutation. Both works like a entry point of our schema. Query is basically for fetching data and Mutations are operations that can modify the data.
3.2.2 Resolver
After receiving the query and validating it. The server will execute the resolver to access the data accordingly with the query. Let's write our resolver, because it might be easier to see before explaining.
On a separate file we will define our resolver as follows.
// graphql/mangas.resolver.ts
export enum Demographic {
  SHONEN = "SHONEN",
  KODOMO = "KODOMO",
  SHOJO = "SHOJO",
  SEINEN = "SEINEN",
  JOSEI = "JOSEI",
}

export enum Category {
  ADVENTURE = "ADVENTURE",
  DARK_FANTASY = "DARK_FANTASY",
  ACTION = "ACTION",
  SUPERNATURAL = "SUPERNATURAL",
  DRAMA = "DRAMA",
}

export interface Manga {
  id: string;
  name: string;
  score?: number;
  author: string;
  demographic: Demographic;
  categories: Category[];
}

interface AddMangaInput {
  name: string;
  score?: number;
  author: string;
  demographic: Demographic;
  categories?: Category[];
}

let mangas: Manga[] = [
  {
    id: "1",
    name: "Jujutsu Kaisen",
    score: 8.88,
    author: "Gege Akutami",
    demographic: Demographic.SHONEN,
    categories: [
      Category.ADVENTURE,
      Category.DARK_FANTASY,
      Category.SUPERNATURAL,
    ],
  },
  {
    id: "2",
    name: "Kimetsu no Yaiba",
    score: 9.5,
    author: "Koyoharu Gotōge",
    demographic: Demographic.SHONEN,
    categories: [Category.ACTION, Category.ADVENTURE, Category.DARK_FANTASY],
  },
];

export const mangasResolvers = {
  Query: {
    mangas: async (parent, args, context, info) => {
      return mangas;
    },
    mangaById: async (_parent: unknown, { id }: { id: string }) => {
      const manga = mangas.find((manga) => manga.id === id);

      if (!manga) {
        throw new Error(`Manga with id ${id} not found!`);
      }

      return manga;
    },
  },
  Mutation: {
    createManga: async (_p: unknown, { input }: { input: AddMangaInput }) => {
      const id = (mangas.length + 1).toString();
      const mangaToAdd: Manga = {
        id,
        ...input,
        categories: input.categories ? input.categories : [],
      };
      mangas = [...mangas, mangaToAdd];

      return mangas[mangas.length - 1];
    },
  },
};
The Manga Resolver has two top level Object fields called Query and Mutation, those are the root of the resolver. Inside thos objects it has custom resolver methods. If you pay attention to the structure you will notice that they are nothing more than functions and each receives four arguments.
- parent -> The parent object;
- args -> The arguments provided to the field in the GraphQL query;
- context -> Holds contextual information like the currently logged in user, or access to a database;
- info -> Field-specific information relevant to the current query as well as the schema details;
In this case we are storing our data in memory, since we are doing this let's refactor this part and provide the access to this data through the context.
3.2.3 Refactor the stored data operations to the Context
On the graphql folder let's remove some logic from our resolver. First let's separate the types so we can find and reuse it easily everywhere.
Create a file in types/mangas.ts and extract them from he resolver file as follows.
// types/mangas.ts

export enum Demographic {
  SHONEN = "SHONEN",
  KODOMO = "KODOMO",
  SHOJO = "SHOJO",
  SEINEN = "SEINEN",
  JOSEI = "JOSEI",
}

export enum Category {
  ADVENTURE = "ADVENTURE",
  DARK_FANTASY = "DARK_FANTASY",
  ACTION = "ACTION",
  SUPERNATURAL = "SUPERNATURAL",
  DRAMA = "DRAMA",
}

export interface Manga {
  id: string;
  name: string;
  score?: number;
  author: string;
  demographic: Demographic;
  categories: Category[];
}

export interface AddMangaInput {
  name: string;
  score?: number;
  author: string;
  demographic: Demographic;
  categories?: Category[];
}
Now we can create our context file graphql/context.ts. It will later be provided by context.
// graphql/context.ts

import { NextApiRequest, NextApiResponse } from "next";
import { Category, Demographic } from "../types/mangas";
import type { AddMangaInput, Manga } from "../types/mangas";

let mangas: Manga[] = [
  {
    id: "1",
    name: "Jujutsu Kaisen",
    score: 8.88,
    author: "Gege Akutami",
    demographic: Demographic.SHONEN,
    categories: [
      Category.ADVENTURE,
      Category.DARK_FANTASY,
      Category.SUPERNATURAL,
    ],
  },
  {
    id: "2",
    name: "Kimetsu no Yaiba",
    score: 9.5,
    author: "Koyoharu Gotōge",
    demographic: Demographic.SHONEN,
    categories: [Category.ACTION, Category.ADVENTURE, Category.DARK_FANTASY],
  },
];

const db = {
  getMangas: async () => {
    return mangas;
  },
  findMangaById: async (id: string) => {
    const manga = mangas.find((manga) => manga.id === id);

    if (!manga) {
      throw new Error(`Manga with id ${id} not found!`);
    }

    return manga;
  },
  createManga: async (input: AddMangaInput) => {
    const id = (mangas.length + 1).toString();
    const mangaToAdd: Manga = {
      id,
      ...input,
      categories: input.categories ? input.categories : [],
    };
    mangas = [...mangas, mangaToAdd];

    return mangas[mangas.length - 1];
  },
};

export type Context = {
  db: typeof db;
};

export async function createContext(
  req: NextApiRequest,
  res: NextApiResponse
): Promise<Context> {
  return {
    db,
  };
}
Finally update the mangas.resolver.ts file to use the methods provided by context.
// graphql/mangas/mangas.resolver.ts

import type { Context } from "../context";
import type { AddMangaInput } from "../../types/mangas";

export const mangasResolvers = {
  Query: {
    mangas: async (_parent: unknown, _args: unknown, ctx: Context) =>
      await ctx.db.getMangas(),
    mangaById: async (_parent: unknown, { id }: { id: string }, ctx: Context) =>
      await ctx.db.findMangaById(id),
  },
  Mutation: {
    createManga: async (
      _p: unknown,
      { input }: { input: AddMangaInput },
      ctx: Context
    ) => await ctx.db.createManga(input),
  },
};
Note: In this case we are using custom methods to manipulate the mangas object, but we can provide literally everything in the context. Like third parties APIs instances, database access, user data, etc.
3.3 Creating an executable schema.
The GraphQL settings are ready, now we are going to create an executable schema. I prefer this approach because it is easier to separate schemas and resolvers by domain as our application grows. To do that let's install @graphql-tools/schema.
$ npm install @graphql-tools/schema
Inside graphql folder create an index file which will export our executable schema.
// graphql/index.ts

import { makeExecutableSchema } from "@graphql-tools/schema";
import { mangasResolvers } from "./mangas/mangas.resolver";
import { mangaSchema } from "./mangas/mangas.schema";

const schemas = [mangaSchema];
const resolvers = [mangasResolvers];

export const schema = makeExecutableSchema({
  typeDefs: schemas,
  resolvers: resolvers,
});
After that all you have to do is import it and add it to the apollo server constructor.
// pages/api/graphql.ts

import { ApolloServer } from "apollo-server-micro";
import type { NextApiRequest, NextApiResponse } from "next";
import { schema } from "../../graphql";
import { createContext } from "../../graphql/context";

const apolloServer = new ApolloServer({
  schema,
  context: createContext,
});

const startServer = apolloServer.start();

{ ... }
4. Testing the server
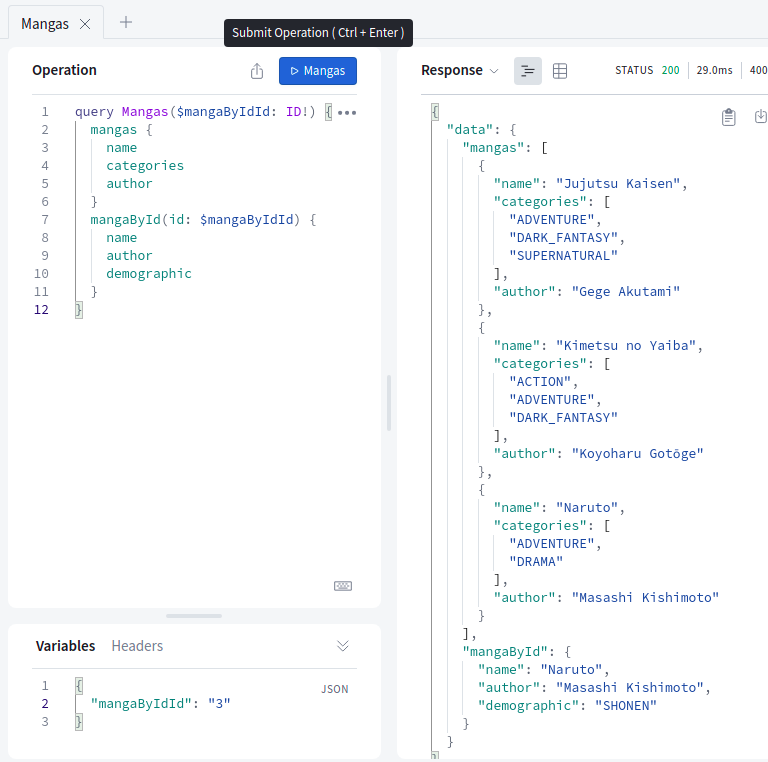
Almost done, you can test the GraphQL API and play around creating some queries. In order to do that, just run the application and navigate to localhost:3000/api/graphql.
5. Conclusion
We were able to setup a GraphQL server on the next.js application covering the core concepts around GraphQL.
Setting up a GraphQL server on Next.js proved to be a powerful strategy, because we can query it easily and return only the necessary data to the client side as we did on Apollo Studio Explorer and it will load only the necessary data avoiding over-fetching.
Moreover, the GraphQL server can work like a BFF (Back-end for Front-end) delivering data in a more convenient way.


