How to Write Type-Safe Tests for your Solidity Smart Contracts with Typescript and TypeChain

Hey there! 👋🏽 I'm a tech-savvy software engineer from Brazil. When I'm not crafting solutions or exploring new tech realms, I'm likely daydreaming about my next beach escape or scouting hidden food gems. Whether it's debugging intricate lines of code or discovering delicious local flavors, I'm all about diving into life's exciting experiences. 🇧🇷 👨💻 🏝️ 🌮
Solidity is a programming language created for implementing smart contracts which can set rules to manipulate accounts within the Ethereum state.
Those apps running on the decentralized network popular known as DApp (Decentralized Application) have their back-end code (smart contracts) running on a decentralized network such as Ethereum and not on a centralized server.
This is the reason a DApp is especially good for some types of applications such as voting, crowdfunding, blind auctions, and multi-signature wallets.
Besides the benefits of DApps like privacy and data integrity the maintenance is one of the main challenges for developers working with it. This happens because once the smart contract is deployed you cannot change it. Therefore, automated tests are very important on DApp development.
Usually to test smart contracts the contract is deployed to a local test network. Beyond that, its used a JavaScript library such as web3 or ethers to interact with the contract and some assertion library like chai to verify the expected values and behaviors.
This approach has a lot of benefits like the popularity of JavaScript and it can also simulate very well the interactions we will expect in the client side. But JavaScript is a dynamic typed language and we lose all the benefits of working with a statically typed language like Solidity like preventing compilation bugs or having easy access to all the available functions of your contract.
Based on this, in this tutorial we will learn how to write type-safe tests for a smart contract.
If you want to go further and study more about DApps, the Ethereum portal has a good introduction about this subject. Click here to access.
Prerequisites
VSCode
You can use another IDE if you want but I strongly recommend VSCode since the Solidity set up is pretty straight forward. You must install the solidity extension for VSCode and everything should work out of the box.
Node.js
My current version is v12.22.2 but you can use a newer version if you want.
Tools Overview
Environment
Hardhat
Hardhat provides a development environment that helps you to compile, deploy, test, and debug your Ethereum software. It comes with a local network for testing purposes and you can also add plugins to create custom workflows.
Ethers
Ethers is a JavaScript library that helps you to interact with the Ethereum Blockchain.
TypeScript
TypeScript is an open-source language which adds static type definitions to JavaScript code.
Testing
Waffle
Waffle is a testing framework for smart contracts it has some cool features like a set of chai matchers, easy contract importing, fast compilation and it is compatible with TypeScript.
Mocha
Mocha is a JavaScript test runner. Waffle uses mocha by default.
Chai
Chai is an assertion library that provides helper functions to compare values on our tests in an easy and declarative way.
Plugins
typeChain-hardhat
TypeChain plugin automatically generates TypeScript bindings for smart contracts while using Hardhat.
Walkthrough
Starting the node project
On your project folder run the following command:
npm init -y
This command creates a package.json file for your project, if you are used to node.js projects you are very familiar with this.
Initialize hardhat sample project
To initialize your Hardhat project run the following command in your project folder:
npx hardhat
You must choose between Create a sample project or Create an empty hardhat.config.js. For this tutorial we are going to Create a sample project, since our focus is on TypeScript set up.
After you choosing Create a sample project it will ask if you want to add a .gitignore file and if you want to install the dependencies. You can accept both of them.
Now you must have the following folder structure on your project:
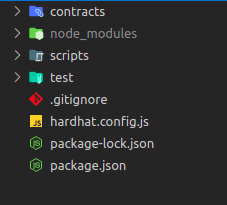
contractsfolder is where you will find your solidity files.scriptsfolder is where your hardhat scripts will be located.testfolder is where your tests will be located (genius!).
One important thing you might have noticed is that hardhat created a hardhat.config.js file. This is where your hardhat configurations and plugins are set up. For now we are going to update this file and remove the sample task, it should look like this:
// hardhat.config.js
require("@nomiclabs/hardhat-waffle");

/**
 * @type import('hardhat/config').HardhatUserConfig
 */
module.exports = {
  solidity: "0.8.4",
};
Compiling and testing the project
Add the compile and test script to your package.json file. It should look like this:
{
  "name": "ts-test-solidity",
  "version": "1.0.0",
  "description": "",
  "scripts": {
    "test": "hardhat test",
    "compile": "hardhat compile"
  },
  "keywords": [],
  "author": "",
  "license": "ISC",
  "devDependencies": {
    "@nomiclabs/hardhat-ethers": "^2.0.2",
    "@nomiclabs/hardhat-waffle": "^2.0.1",
    "chai": "^4.3.4",
    "ethereum-waffle": "^3.4.0",
    "ethers": "^5.4.3",
    "hardhat": "^2.5.0"
  }
}
Now you can run the script npm run compile that will compile your contract creating two folders cache and artifacts. The artifacts folder is very important because there is where you can find your contract ABI.
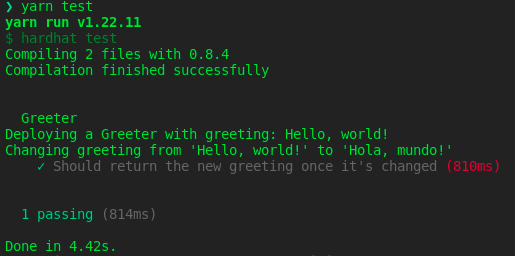
You can also run the tests for your contract with npm run test and you should have a prompt like this.
Installing TypeScript
Hardhat uses TypeScript and ts-node under the hood, so you need to install them. Running the following command on your terminal.
npm install --save-dev ts-node typescript
To be able to write your tests in TypeScript, you also need the type declarations from the packages we are going to use.
npm install --save-dev chai @types/node @types/mocha @types/chai
Adding a tsconfig.json file (Optional)
Note: Hardhat doesn't need a
tsconfig.jsonso you can skipt this step if you want.
There are some ways to create a tsconfig.json file. You can create a default file using npx tsc --init or you can simply create the file in the project root folder by hand. What matters is that you will end with a configuration like this:
  "compilerOptions": {
    "target": "es2018",
    "module": "commonjs",
    "strict": true,
    "esModuleInterop": true,
    "resolveJsonModule": true,
    "outDir": "dist"
  },
  "include": ["**/*.ts", "**/*.tsx"],
  "exclude": ["node_modules"]
The esModuleInterop and resolveJsonModule are required by Waffle.
Type-safe configuration (Optional)
To type-safe the configuration file just rename your hardhat.config.jsfile to hardhat.config.ts. Now you can add the types to your configurations, moreover you can use es6 import and exports, like this:
// hardhat.config.ts
import { HardhatUserConfig } from "hardhat/config";
import "@nomiclabs/hardhat-waffle";

const config: HardhatUserConfig = {
  solidity: {
    compilers: [{ version: "0.8.5", settings: {} }],
  },
};

export default config;
Tests with TypeScript
First rename your sample-test.js file to sample-test.ts. You will notice some error on ethers. To fix this you can explicitly import ethersfrom hardhat like this:
// test/sample-test.ts
import { expect } from "chai";
import { ethers } from "hardhat";

describe("Greeter", () => {
  it("Should return the new greeting once it's changed", async () => {
    const Greeter = await ethers.getContractFactory("Greeter");
    const greeter = await Greeter.deploy("Hello, world!");
    await greeter.deployed();

    expect(await greeter.greet()).to.equal("Hello, world!");

    const setGreetingTx = await greeter.setGreeting("Hola, mundo!");

    // wait until the transaction is mined
    await setGreetingTx.wait();

    expect(await greeter.greet()).to.equal("Hola, mundo!");
  });
});
Adding TypeChain
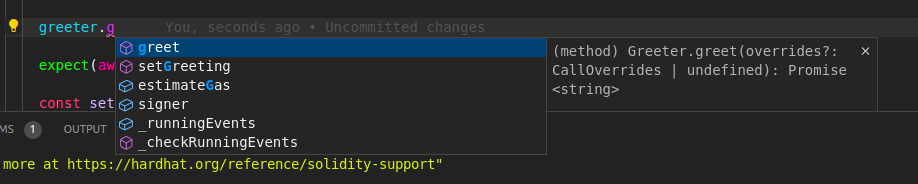
If you look into our sample-test.ts file the greeter constant is typed as Contract. And our contract methods such as greet and setGreeting are missing (check the picture below).

This is happening because the ContractFactory returns a Contract class and if you check the class code you will notice that our contract functions are typed as any or as a ContractFunction which is also very generic function.

To solve this problem we will rely on TypeChain. This plugin will automatically generate custom types for our smart contracts. Cool isn't it?
In order to install TypeChain plugin just do:
npm install --save-dev typechain @typechain/ethers-v5 @typechain/hardhat
After the installation succeed you must import TypeChain on the hardhat.config.ts file.
// hardhat.config.ts
import { HardhatUserConfig } from "hardhat/config";
import "@nomiclabs/hardhat-waffle";
import "@typechain/hardhat";

const config: HardhatUserConfig = {
  solidity: {
    compilers: [{ version: "0.8.5", settings: {} }],
  },
};

export default config;
Now if you compile the project it should create a new folder named typechain.
Note: If this folder was not created just remove the cache and artifacts folders and compile it again.
Now you can import your Greeter contract class from the typechain directory as follows.
import { expect } from "chai";
import { ethers } from "hardhat";
import { Greeter } from "../typechain/Greeter";

describe("Greeter", function () {
  it("Should return the new greeting once it's changed", async function () {
    const Greeter = await ethers.getContractFactory("Greeter");
    const greeter: Greeter = await Greeter.deploy("Hello, world!");

    await greeter.deployed();

    expect(await greeter.greet()).to.equal("Hello, world!");

    const setGreetingTx = await greeter.setGreeting("Hola, mundo!");

    // wait until the transaction is mined
    await setGreetingTx.wait();

    expect(await greeter.greet()).to.equal("Hola, mundo!");
  });
});
Awesome! As you can check your contract is typed and you can access the contract functions.
Conclusion
We were able to type-safe our Solidity tests using TypeChain and Typescript. Creating type-safe tests is very important because as our contract grows we can have direct access to our list of functions, besides it prevent typos and errors before running the tests.


